Wednesday, August 31, 2011

Tree age and drought stress.

    Looking over our pecan grove,  I've noticed that large, older trees handle drought much better that young trees.  To show you what I'm talking about, I photographed leaves and nuts from two trees. The first was 28-years-old and about 12 inches in diameter, while the second was 9-years-old and about 3 1/2 inches in diameter. Both trees had been grafted to Pawnee and both were bearing nuts.
    In the photo above, the leaf on the left is from the older, larger tree while the leaf on the right was pulled from the young tree. Both leaves were taken from the mid portion of this year's growth. The smaller leaves on the younger tree were also lighter green.

    I  then pulled a cluster of nuts off of each tree. The cluster on the left is from the older tree, while the smaller nuts on the right were pulled from the smaller tree. In a previous post, I mentioned that young trees often produce smaller pecans than mature trees. But this year, the effect will be exaggerated by the drought.
    The smaller leaves and nuts found on young trees is an above ground reflection of the fact that the tree has not yet developed a large enough root system to dominate its surroundings.  A tree with a limited root system has a harder time competing for water and nutrients. Less water and nitrogen means smaller, lighter green leaves and much smaller pecans at harvest.
     Have you ever wondered why young trees respond so well to weed control while older trees seem to tolerate ground cover plants growing right up to the trunk?. It all about becoming the dominate plant in the landscape. From my experience, pecan trees become dominate when the reach 10-12 inches in diameter.

Monday, August 29, 2011

Double-row intercrop system: Pecans and soybeans.

     Back in June, I posted a photo of planting soybeans in our pecan intercrop study area.Today, the beans look good with plants averaging 30 inches tall (photo at right). However, just like area farmers, our soybean crop has struggled with drought all summer long. Fortunately, we had 4 inches of rain during the second week of August, giving the bean crop a needed boost. Plants grew nearly 2 feet taller in the week following the rain.
     Now, another dome of high pressure has settled over SE Kansas and we are back to hot dry conditions. Our bean crop looks good from the road, but on closer inspection you'll find very few pods setting on the plants. Poor pod set is directly related to the hot, dry weather. Needless to say, farming has been a challenge in 2011!
      Despite this year's drought, I still believe that our double-row, intercrop system has great potential for making a new pecan planting financially sustainable during the years of orchard establishment. The grass alleyway between each double row of trees is the unique feature of  this system. The alleyway allows for easy access to the trees for maintenance operations such as grafting, summer pruning and pest control; all without trampling the adjacent agronomic crop..  For those planning a new orchard, here's the planting plan for the double row system (below).

Monday, August 22, 2011

Pecan kernel filling

     Pecans are starting to fill their kernels. Not many people think about the process of kernel filling, but I find it fascinating. The photo at right shows a Pawnee nut that I cut in half this morning. You can plainly see the two kernel halves in cross section, but this photo shows us so much more.
    The blue arrow in the upper right corner of the photo points to a well developed shell. Now that the shell is fully formed, the nut can no longer increase in size.
    The red arrow points to the outer skin or seed coat of the developing kernel. Just inside seed coat (yellow arrow) you can see a light-green gelatinous zone. This is the very start of kernel deposition. Kernel tissue grows from the seed coat inward, eventually filling the seed cavity. Once the cavity is filled, kernel deposition continues, compressing the packing material (green arrow) between the kernel halves and against the inside of the shell.
     If a pecan tree runs out of water during the kernel filling period, kernel deposition will be inhibited. At harvest, drought stricken trees will produce nuts with small kernels that have a hollow crease in the center of each kernel half, both symptoms of inadequate nut filling.  

Wednesday, August 17, 2011

Pecan nut casebearer--The second summer generation

      For the most part, the 1st summer generation of the pecan nut casebearer is the only generation of this insect that pecan growers worry about controlling. The first summer generation attacks pecans right after pollination, with a single larvae capable of destroying an entire cluster of nuts.
    However, pecan nut casebearer produces 3 generations per year. In the photo at above, you can see a hole or pile of pecan nut casebearer frass at the base of each of these nuts. These nuts were attacked in mid-July by the second summer generation. Since the nuts are much larger in mid-July, it only takes one nut to satisfy the hunger of a casebearer larva. The second and third generations rarely cause economic levels of damage.
    This year we are seeing more nut drop from second generation pecan nut casebearer than in the previous 2 summers. Could this be a foreshadowing of higher casebearer populations next May? We will need to keep a sharp look out and maybe round up some more volunteers for running pherome traps.

Monday, August 15, 2011

Time to control weevil and stinkbug

   We had over 4 inches of rain last week. The rains came slow and over several days so every drop soaked into the ground. The only down side of the rain is the effect it has on pecan weevil emergence. The rain softened the soil and adult weevils have started to emerge.
    Today we started spraying the grove to control pecan weevil and to slow down stink bug feeding (photo at right). Most nuts are in the water stage so weevils aren't laying many eggs at this point but the amount of nut drop we are seeing has prompted my decision to apply "Warrior" insecticide to our grove.
     Here's a photo of an adult pecan weevil looking for just the right spot to puncture a pecan. We've kept pecan weevil populations at the Experiment Field very low with over 30 years annual control measures. At this point, stink bugs may be a larger problem for us than weevils. 

Friday, August 12, 2011

Checking nut development

    Pecan growers are often curious to see how their nut crop is progressing. Cutting nuts open at this time of year  is a good way to check on kernel development. The photo at left shows a native pecan that has almost made it to full water stage (you can even see the drips of liquid endosperm.spilled near the nut halves). If the nut is cut just right (like the one in the photo), you can see both halves of the expanding kernel. If you cut the nut open the wrong way, all you'll see is the area of the kernel that connects the two halves. So here is a brief lesson on cutting open pecans to check nut development.

    When you pull a nut off the tree, look at the stem end of the nut. Notice that the attachment scar is oval in shape (photo at right). The long axis of the oval is in line with the partition that separates the two kernel halves. The short axis of the oval cuts across the kernel halves.

    To see kernel development, you need to cut the nut along the short axis of the oval. In other words, cut on the red line shown in the photo at right. Note that on many pecan cultivars, there is a scruffy tan line on the outside of the shuck that marks the location you need to cut.

     To cut the nut open, I use a pruning shear. With the blade wide open, I push the nut into the blade right along the cut line (photo left). The stem end of the nut is located at the top of the photo, in a position I can see that the nut is properly oriented in the shear. I then cut the nut in two. Make sure you hold the clippers and nut away from your body, the water inside the nut will stain your hands and clothes black.

   Once the nut is cut in two, you should be able to see both sides of the kernel. The yellow arrow in the photo at right points to the kernel. At this point the kernel appears empty but it was filled with liquid endosperm before the nut was cut open.

Thursday, August 11, 2011

Building a pecan weevil trap

    Knowing when to spray for pecan weevil is the first step towards controlling the number one insect pest of pecans. "Circle" pecan weevil traps have proven to be the best method for determining when pecan weevil adults are emerging from the soil.
    In this post I'll be giving step-by-step instruction for building a weevil trap. Before starting you will need to gather the following tools and supplies.

Tools
     Metal shears
     Heavy duty staple gun
     Book binder's stapler
     Hot glue gun
     Ruler

Supplies
     Aluminum screen wire, 36 inches wide
     Wood strips, 1.5 inches wide and 0.5 inches thick
     1/2 and 3/8 inch staples for staple gun
     1/4 inch staples for book binder's stapler
      Deck screws  (3 inches long)
      10 gauge wire
      glue sticks
      Boll weevil trap top assembly (order here)


Step 1. Measure out 24 inches of screen wire and cut with shears.

Step 2. Fold screen wire in half (length wise). Press on the fold just enough to mark the center of the screen.

Step 3. Use a round object (8.5 to 9 inches diameter) to help trace a semi-circle at the marked half way point on the screen wire.

Step 4. Use the tip of the shear to trace the semi-circle onto the screen wire.

Step 5. Use the shear to cut out the semi-circle.

Step 6. Fold over the screen wire along the edge of the semi-circle to form a smooth edge.

Step 7. Place a 17 inch piece of wood strip down the middle of the screen wire. Fold the screen wire over twice along the bottom to make a smooth strong edge.

Step 8. Flip the screen wire over and staple the screen to the wood strip using 3/8 inch staples. The first staple should be placed 2 inches down from the semi-circle. Continue stapling down the wood strip every 2 inches until you get to the bottom of the wood strip

Step 9. Attach an 11 inch strip of wood along the upper edge of the screen wire, again staring 2 inches below the semi circle.

Step 10. Clamp a 30 inch long piece of 2x4 into a bench vise at a slight upward angle from horizontal. Place the long wood strip on top of the 2x4 and slip a boll weevil trap top under the screen wire.

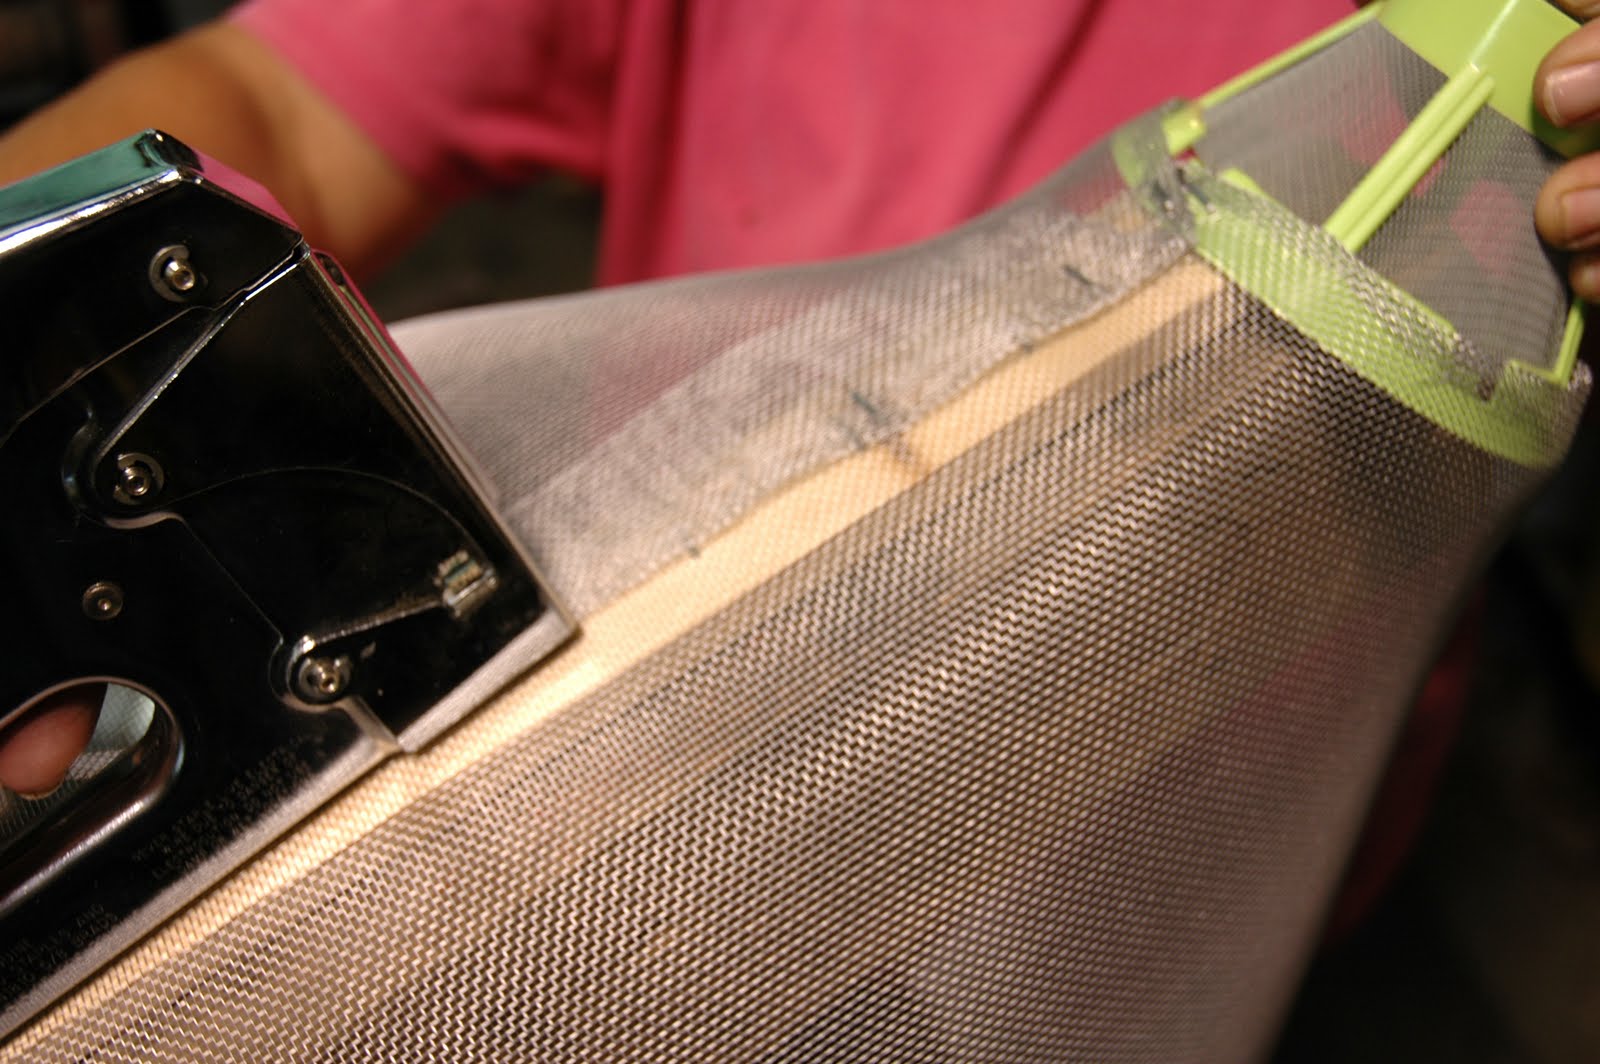
Step 11. Staple trough the screen wire and boll weevil trap into the wood strap using a 1/2 inch staple. Use a hammer to make sure the staple is driven in tightly.

Step 12. Turn the trap over, wrapping the screen wire over the boll weevil trap top and place the short wood strip on the 2x4. Pull the screen tight, setting the trap top on top of the wood strip but under the screen wire. Staple in place with a 1/2 inch staple.

Step 13. Wrap the other side of the screen around the trap top then staple at the top with another 1/2 inch staple.

Step 14. Firmly attach the rest of the screen wire along the short wood strip using 3/8 inch staples. You should now have a cone shaped trap with a boll weevil trap top at the apex.

Step 15. Along the outer edge of the trap (the edge that hasn't been folded over yet), fold the screen wire over about 1.5 inches. As you make the fold, tuck the fold under the short wood strip.

Step 16. Cut a 36 inch piece of 10 gauge wire to place under the fold on the outer edge of the trap.

Step 17. Use the book binder's stapler to hold the wire inside the fold of the screen wire.

Step 18. Crimp the screen wire tightly around the boll weevil trap top. Fill in any gaps between the screen wire and trap top with hot glue.

Step 19. Use a standard No. 2 pencil to widen the hole in the top of the boll weevil  trap top. (pecan weevils are larger than boll weevils)

Step 20. Install the plastic cylinder and perforated top to the boll weevil trap top assembly.

Step 21. Install your new pecan weevil trap on a tree with a history of weevil problems. Scrape the rough bark off the tree at the point of trap installation. Use 2 deck screws to attach the long wood strip to the tree. Stretch out the screen wire across the bottom of the trap and staple to the tree using 1/2 inch staples.


Monitoring Traps

     Install traps by the 1st of August. Check traps at least 3 times per week. If you capture an average of 2 weevils per trap it is time to spray for pecan weevil. Continue to monitor traps after applying the first insecticide treatment. If weevils continue to emerge, wait at least 10 days before making a second insecticide application.

Monday, August 8, 2011

Summertime squirrel damage

   We are seeing two types of summertime squirrel damage. The most noticeable is the stripping of smooth bark off of young branches and the subsequent death of leaves on that shoot. The second, is early feeding on nuts which is often overlooked.
    When food sources become scarce, flying squirrels will strip the bark off smooth barked branches to feed on the tree's cambium. In the photo at left, you can see that both young, upright shoots have had patches of bark removed by squirrels. At the bottom of the photo, you see a branch of dried-up leaves which developed after the stem that supports those leaves was completely girdled by squirrels.
 
    Early nut feeding by squirrels usually goes unnoticed. This year, we are using drop cages to determine when and why nuts drop from trees during the growing season. Today we found a small pile of nut fragments in one of our cages (photo at right). It seems that squirrels are taste testing a few nuts long before kernels develop or maybe they are just looking for a water source in this drought.

Stink bug nut drop

    During early August, several species of stink bugs migrate into pecans groves and start feeding on developing nuts. If a stick bug punctures a nut to feed on the kernel during nut enlargement, that nut will drop from the tree. In the photo at right, The red arrows point to puncture marks left after stink bug feeding. This nut was punctured 3 times (the upper red arrow points to two punctures very near each other). We found this nut in one of our drop cages that collect all the nuts that fall from the tree during the course of the season. It usually takes 3-5 days after the damage occurs for the nut to drop off the tree, so this nut was probably attacked by a stink bug late last week
     If you cut the nut open (photo at left), you will note that the developing kernel has turned dark brown to black. The yellow arrow points to the developing kernel that is less that 1/2 way to full water stage.
    In the photo, you will notice that the cut surface of the shuck has turned black. This occurs when shuck cells are exposed to the air and is not a sign of stink bug feeding. However, the darken areas inside the shell are the result of insect attack.
    This year the weather has been so dry that even stink bug populations seem suppressed. It may be that a total lack of succulent plant growth earlier in the season has made it difficult for stink bugs to  grow, reproduce, and build their population numbers. We'll be watching our drop cages for signs of increased stink bug activity.

Thursday, August 4, 2011

The drought continues

    It hasn't been this dry since the summer of 1980. I was out in the grove the other day checking out the pecan crop and inspecting the dry weather cracks that have formed in the soil. In a field of 20-year-old pecan trees, the cracks were enormous (photo at right). That's  a grafting knife (6.5 inches long) in the photo spanning a soil crack that was over 30 inches deep. What was interesting to me about these soil cracks was their location among the trees. The widest cracks were found exactly half way between adjacent trees (trees planted 30 ft. x 30 ft.). In fact, each tree has a soil crack ring around the tree that runs about 15 feet from the trunk. The formation of these rings tell us that each tree has its own, separate area for soil water extraction
    The situation in our native groves is very different. Large soil cracks have not developed. The roots of our native trees are so intertwined that each trees does not have an individual root zone and water is being extracted from the soil evenly across the grove.
   The soil at the research station is an Osage silty clay. The shrink/swell capacity of this soil is extremely high. We see soil cracking almost every summer but 6 inch wide cracks represent the extreme end of the soil cracking phenomenon. It will take 10 to 15 inches of rain to close up these cracks before harvest.

Wednesday, August 3, 2011

Serpentine leafminer

    Sometimes when I walk through our grove I'll spot one of the many minor pests of pecan. This time its was the serpentine leaf miner (photo at left). What looks like a white worm on the surface of a leaflet is actually a tunnel made by the larvae of  Stigmella junglandifoliella. This very small larvae feeds on leaf tissue just below the epidermis of the leaf. In the photo, you can see that the larvae hatched near the tip of the leaflet and started to tunnel up along the left side. Note that the tunnel gets wider as the larvae grows in size. Eventually the larvae will pupate in the tunnel. A short while later, a small, purple and white moth, measuring only 1/8 inch in length,will emerge, break through epidermis of the leaf  and start a new generation of leaf miners.  This insect can have 4-5 generations per year. Control measures are necessary only in rare outbreak situations.