Thursday, August 30, 2018
Pecan kernel filling
I cut open a Kanza nut today and captured the kernel filling process in progress. The first thing I noticed when slicing the nut in half is that the shell was completely hard. In the photo above, the arrow marked "S" points to the shell. At this point in time, the outer shell of the nut is fully formed and light tan in color.
The arrow marked "K" points to newly formed pecan kernel. The white creamy color is what we expect pecan kernel to look like. However, inside the white kernel layer is a translucent layer I've marked "J". This is rapidly forming kernel tissue that has yet to fully differentiate into its final solid white state. The translucent appearance of this not-yet-fully-formed kernel tissue is the origin of the term "gel stage".
When I first started working with pecans I was given the impression that kernel development progressed from water stage, to gel stage, to firm kernel. It was almost like the water turns to gel then solidifies into kernel. This is not how it works.
New kernel tissue develops starting from just under the pecan seed coat. As new kernel tissue develops, the water inside the nut is absorbed back into the tree. The amount of "gel" that can be seen inside the nut is dependent on the speed of kernel formation. The rate of kernel deposition is influenced by weather conditions and cultivar. This is the most "gel" I've ever found inside a Kanza nut. In past years, the gel layer was much thinner.
Kernel deposition is not the only pecan tissue I've seen with this translucent appearance. Back during grafting season, I noticed several stock trees with a layer adjacent to the cambium that had a water soaked or gel type look. This was obviously new wood tissue being formed that hadn't fully solidified.
Now when I think about pecan kernel development, I think of it in two stages. The first is "ovule expansion". Ovule expansion occurs during the first half of the growing season as pecan fruit grow rapidly in size. The culmination of this stage occurs when the nut achieves its full size and the inside of the nut is filled with water. The second stage is "kernel deposition". Kernel begins to develop on the inside of the seed coat and works it way towards the center. Kernel deposition continues until the shuck starts separating from the shell (shuck split).
Labels:
kanza,
kernel filling
Tuesday, August 21, 2018
Making a pecan weevil spray
After a week of showers it was time for me to make an insecticide application for pecan weevil. So, I attached my sprayer, put the tractor in 4-wheel-drive, and slogged my way over saturated ground to apply Warrior II insecticide to protect my nut crop (photo at right). It has been 12 days and nine inches of rain since I last sprayed (mainly for stinkbugs). This time my objective was to kill all weevils in the grove before they can lay eggs inside the nuts.
I'll need to wait to see how things go during the last part of August and early September before deciding whether or not to make a second weevil spray in a few weeks.
Labels:
pecan weevil
Monday, August 20, 2018
The new pecan cultivar, 'Hark', looks promising
We've had 9 inches of rain over the past week and I've found it hard to get out in the grove to look at pecan trees and take photos. Fortunately, the sun popped out today and I was able to take a quick look around a portion of my orchard. The nuts on most cultivars are fully sized with Kanza and Hark at full water stage. My oldest Hark tree has a trunk about 7 inches in diameter and has developed a nice full canopy (photo at right). This tree is located right next to a couple of Kanza trees so its easy to compare these two scab resistant cultivars.
As a young tree, Hark is easier to train than Kanza. Hark seems to have a more naturally spreading growth habit and produces fewer stalked buds than Kanza. As you know, stalked buds grow into narrow-angled branches that are prone to wind breakage. Although Kanza is not a terribly hard tree to train, I do need to keep a close look out for stalked buds during the early years of tree development.
The 2018 crop load on Hark appears to be very similar to my adjacent Kanza trees. The nut yield won't be limb breaking but the 2018 crop appears "good" on both these cultivars. In fact, Kanza and Hark have the best nut set of any cultivars growing on my farm this year. Hark set nuts mainly in clusters of three (photo at left). This cluster size is similar to Kanza and to Major, a parent of both Kanza and Hark.
With plenty of moisture available to fill out kernels, I'll be anxious to compare the nut quality of Kanza and Hark this coming Fall.
As a young tree, Hark is easier to train than Kanza. Hark seems to have a more naturally spreading growth habit and produces fewer stalked buds than Kanza. As you know, stalked buds grow into narrow-angled branches that are prone to wind breakage. Although Kanza is not a terribly hard tree to train, I do need to keep a close look out for stalked buds during the early years of tree development.
The 2018 crop load on Hark appears to be very similar to my adjacent Kanza trees. The nut yield won't be limb breaking but the 2018 crop appears "good" on both these cultivars. In fact, Kanza and Hark have the best nut set of any cultivars growing on my farm this year. Hark set nuts mainly in clusters of three (photo at left). This cluster size is similar to Kanza and to Major, a parent of both Kanza and Hark.
With plenty of moisture available to fill out kernels, I'll be anxious to compare the nut quality of Kanza and Hark this coming Fall.
Location:
Chetopa, KS 67336, USA
Thursday, August 9, 2018
Mid-summer training of a bark graft
I've been making my way through the orchard, trimming grafts, removing stalked buds, and controlling weeds. This week I came across a prime example of a bark graft I made back in late April. The graft was pruned to one shoot growing from the scion back in June and I tied the new growth to a bamboo training stick (photo at right). The scion has grown nearly 5 feet in height. It looks impressive but this tree needs some care to keep the tree well balanced and to strengthen the central leader.
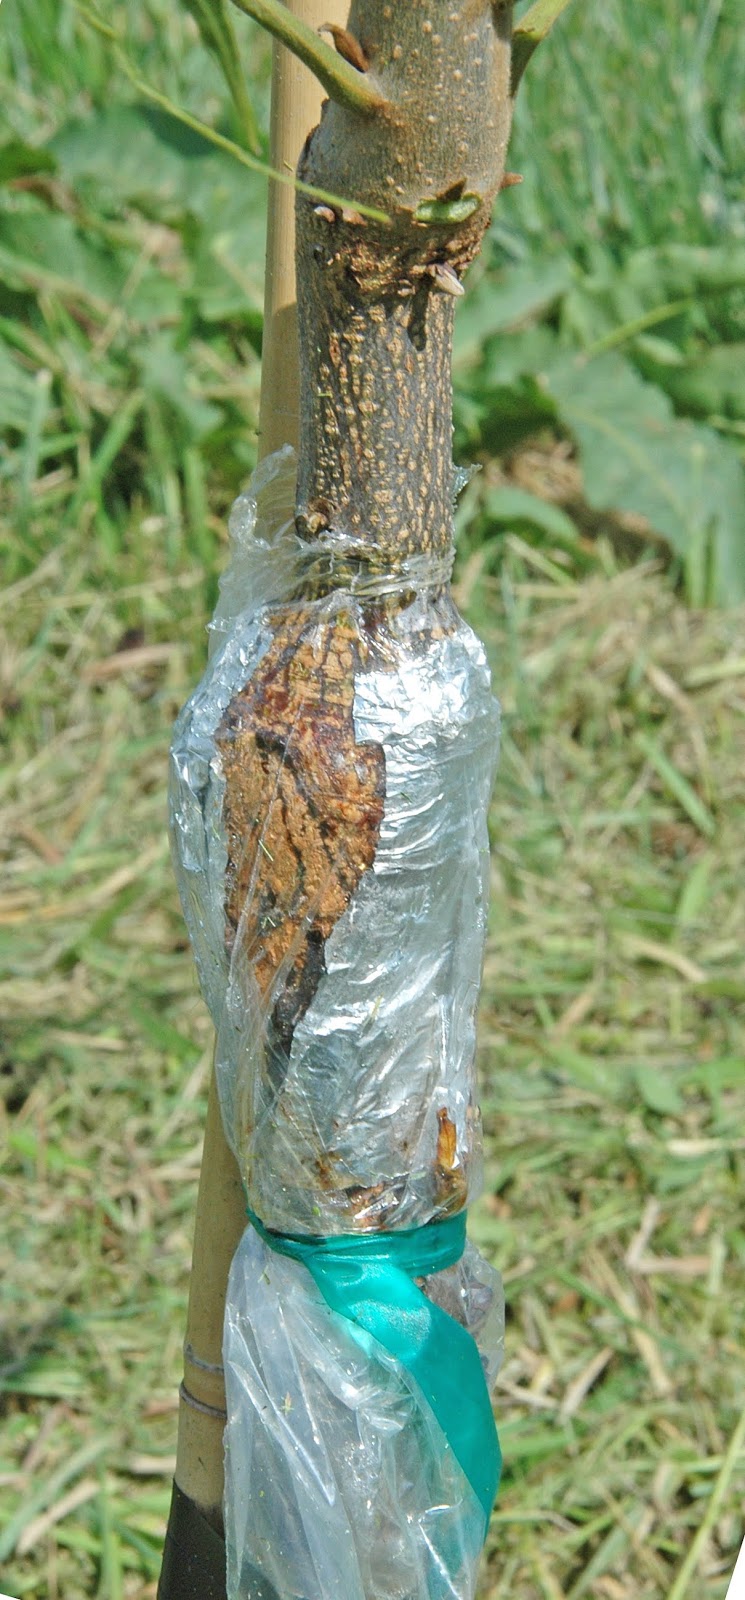
The graft union of this tree is growing so rapidly that the new growth has split open the aluminum foil I used to wrap the graft union (photo at left). During the month of August, I like to remove the plastic bag and aluminum foil then paint the graft union with white latex paint (to prevent sun scald). This tree appears to be more than ready to shed all graft wraps.
Once the grafts wraps are removed you can see how the tree is healing over the graft union (photo at right). Note that the area where the scion was inserted under the bark has expanded dramatically. In contrast, the trunk on the opposite side of the scion has remained roughly the same size as when the tree was grafted. It is clear from this photo that the tree is putting all its energy into growing the scion.
My first step in addressing the graft union is to cut away some of the dead tissue at the top of the stock. This tree was small enough in diameter that I could use my hand clippers to make a 45 degree cut (photo at left). Making this angled cut will help the tree heal over the wound on the stock must faster.
Once I cut the angle, I use white latex house paint to cover the graft union (photo at right). The paint protects the graft from sun burn and serves as a simple method to mark which trees in my grove have been successfully grafted. I use a paint brush to apply a good solid coat of paint to the area that was formerly covered by the grafting wraps.
Next, I moved my attention to the top of the tree. I noted that the tree had developed numerous stalked buds with one already growing as a small lateral branch (photo at left). To prevent the development of narrow branch angles these stalked buds need to come off.
I first attacked the largest stalked bud that had developed into a shoot. I needed my clippers to remove this shoot (photo at right).
Most of the stalked buds were still small and I could just tear them off the tree. The bud scar left after stalked-bud removal is seen inside the red circle in the photo at left.
As I mentioned earlier, this scion is growing at a rapid pace. In fact, the scion is growing much too tall for the diameter of the central leader. Tall skinny trees have a tendency to bend over under their own weight or snap off in a wind storm. To slow height growth and to promote diameter growth of the stem, I trimmed of the top 10 inches from the tree's central leader (photo at right).
To look at the tree after I was done trimming and training, it doesn't look much different than when I first approached the tree. Sure, you notice the white paint at the graft union but the top of the tree looks almost identical to the tree before I trimmed it. But that's the point, a few simple steps taken now will go a long way in developing a strong, trouble-free pecan tree. Ignore these training tips now and you will probably be faced with making major corrective pruning cuts later in the tree's life.
The graft union of this tree is growing so rapidly that the new growth has split open the aluminum foil I used to wrap the graft union (photo at left). During the month of August, I like to remove the plastic bag and aluminum foil then paint the graft union with white latex paint (to prevent sun scald). This tree appears to be more than ready to shed all graft wraps.
Once the grafts wraps are removed you can see how the tree is healing over the graft union (photo at right). Note that the area where the scion was inserted under the bark has expanded dramatically. In contrast, the trunk on the opposite side of the scion has remained roughly the same size as when the tree was grafted. It is clear from this photo that the tree is putting all its energy into growing the scion.
My first step in addressing the graft union is to cut away some of the dead tissue at the top of the stock. This tree was small enough in diameter that I could use my hand clippers to make a 45 degree cut (photo at left). Making this angled cut will help the tree heal over the wound on the stock must faster.
Once I cut the angle, I use white latex house paint to cover the graft union (photo at right). The paint protects the graft from sun burn and serves as a simple method to mark which trees in my grove have been successfully grafted. I use a paint brush to apply a good solid coat of paint to the area that was formerly covered by the grafting wraps.
Next, I moved my attention to the top of the tree. I noted that the tree had developed numerous stalked buds with one already growing as a small lateral branch (photo at left). To prevent the development of narrow branch angles these stalked buds need to come off.
Most of the stalked buds were still small and I could just tear them off the tree. The bud scar left after stalked-bud removal is seen inside the red circle in the photo at left.
As I mentioned earlier, this scion is growing at a rapid pace. In fact, the scion is growing much too tall for the diameter of the central leader. Tall skinny trees have a tendency to bend over under their own weight or snap off in a wind storm. To slow height growth and to promote diameter growth of the stem, I trimmed of the top 10 inches from the tree's central leader (photo at right).
To look at the tree after I was done trimming and training, it doesn't look much different than when I first approached the tree. Sure, you notice the white paint at the graft union but the top of the tree looks almost identical to the tree before I trimmed it. But that's the point, a few simple steps taken now will go a long way in developing a strong, trouble-free pecan tree. Ignore these training tips now and you will probably be faced with making major corrective pruning cuts later in the tree's life.
Subscribe to:
Posts (Atom)