Saturday, June 29, 2013

Directive pruning results

    Just ten days ago I posted some photos of how I used  directive pruning the shape the growth of a second-year bark graft. Today, I went back to that tree to check on its progress. In the photo series above, you can see the bushy top before pruning, the same tree top after directive pruning, and the new growth that has occurred in just 10 days. Since I top-worked this tree, the growth of the scion is rapid due to the push it gets from a large root system below the graft. As a result, the new central leader has already added 10 inches of top growth in only 10 days.  What's more important is  how dominate the new central leader has become following summer pruning.
    With this year's directive pruning cuts, I have created a tree with at least 14 feet of single trunk. The central leader of this tree is now growing out my reach when I stand on a 8 ft ladder, so this summer's directive pruning cuts will be my last for this tree. From now on, I'll be working on removing branches below the graft. Since I've top-worked a fairly large tree, I need to make sure I remove enough lower growth to push the scion while maintaining a healthy amount of foliage on the tree to feed the roots and shade the trunk.  

Friday, June 28, 2013

Casebearer damage near peak

    Here's the figures on this year's pecan nut casebearer population in an unsprayed native pecan grove at the Pecan Experiment Field (above). As of today, 10.7% of nut clusters in this orchard have been damaged by casebearer. I don't expect the damage level to go much higher at this point, probably leveling off at around 12% damage for the year.

Thursday, June 27, 2013

Pecan seedlings produce simple leaves

    In yesterday's post on growing pecan trees in containers, I presented a photo of nicely-growing, tree seedlings. A copy of that photo is published at right.  Look closely and you'll see that the leaves on these trees don't look like the compound leaves we usually see produced by pecan trees.  The leaves on these seedling trees are simple, appearing as a single elliptical leaf. Are they really pecan trees?
   
   The answer is yes! The first few leaves produced by emerging pecan seedlings are always single bladed. Today, I took a photo of one of my seedling pecan trees (still in the pot) and a normal compound leaf pulled from a three-year-old seedling (photo at right). The leaves don't even look like they come from the same species of tree. However, the seedling in the container will begin to produce compound leaves as it continues to grow. The first compound leaf might have just 3 leaflets, but as additional leaves are produced the number of leaflets will increase.  Eventually, my container grown seedlings will starting looking like "normal" pecan trees.

Wednesday, June 26, 2013

Growing pecan seedlings in containers

   
    This year I decided to raise some pecan seedlings in containers (photo at right).  There are many successful methods for growing pecan trees in pots but I've had several growers ask me for my recipe, so here goes.
   The process starts with some advanced planning. To germinate pecans effectively, the seed needs to be stratified (stored under cold moist conditions). I like to stratify my seed for at least 120 days to improve uniformity of germination. Details of the stratification process were posted previously on this blog.


A germinated pecan seed
     Before talking about pots, soil mixes, and fertilizers, I think its a good idea to become familiar with how a pecan seed germinates and grows in its natural environment. At left is a photo of a germinated pecan. To germinate, the seed must first imbibe enough water to swell the kernel and crack open the shell.  As the seed starts to grow, a vigorous tap root is the first structure formed. Shortly thereafter, a smaller, wiry shoot develops and grows upwards, poking through the soil surface. In nature, a new pecan seedling will invest most of it energy in growing a massive, deep tap root. Above ground, first-year pecan trees rarely grow more than  8-12 inches in height and produce only a hand full of  leaves. This growth pattern is the tree's way of ensuring seedling survival. Between fires, floods, grazing animals and brush hogging, seedling pecan trees often lose above ground parts. By storing a massive amount of plant energy in the tap root, a pecan tree can easily replace a lost top with a new sprout.


Tall One pot (4 x 4 x 14 inches) and
 Anderson Band (2.9 x 2.9 x 5.5 in)
     When growing pecan trees in containers, the tree's natural habit of growing a tap root must be considered. If grown in a typical "flower" pot, the pecan's tap root will hit the bottom of the pot, turn sideways and start circling the bottom of the pot.  The subsequent out-planting of pecan trees with circling roots leads to inadequate tree growth and poor long-term performance. To remedy this problem, special "bottomless" pots have been developed to deal with the tap root problem (photo at right).  By bottomless, this means that the bottom of the pot is open, with only a very limited amount of plastic cross pieces present to help hold the potting media in place. When open-bottomed pots are placed on a screen-wire nursery bench, the tap root grows to the bottom of the pot and then becomes "air-pruned". In other words, the tap root hits air at the bottom of the pot and stops growing. However, air-pruning the tap root doesn't stop all root growth. Once the tap root stops growing,  a profusion of lateral roots are created.  

          When I first starting planting pecans in containers I used the "Tall One" style pot but have since switched to the smaller "Anderson Band" container (photo above).  The smaller pot seems to create a denser profusion of lateral roots and makes transplanting in the Fall easier (smaller hole to dig).  There are many other styles and sizes of containers designed for growing tree seedlings (see Stueve & Sons, Inc.). I've thought about trying some of these other pots but then I look at the supply of pots I already have stacked in the barn and  I always decide to stick with what I've got.   

Bottom view of a Anderson Band container
    The photo at left illustrates air pruning of a pecan root system growing in an Anderson Band container. Notice that the tip of the large, freshy taproot has dried out and died after emerging into the air at at the bottom of the pot.  You can also see that limiting taproot growth promotes the growth of small lateral roots inside the pot. 
     I use a totally artificial soil mix for growing pecan trees in pots. The mix I use contains processed pine bark, peat moss, vermiculite, and perlite. Two commercially available soil mixes are Fafard Growing Mix 52 and Scotts Metro-Mix 702. Since these soil mixes have little or no nutrients needed for plant growth, I mix in a slow release fertilizers such as Osmocote 19-6-12 (12-14 months) and "Micromax Micronutrients".  For each 2.8 cu. ft. bag of soil mix, I add 3 cups of the Osmocote and 1/2 cup of the micronutrients before mixing thoroughly. Once the pecan trees have germinated in the pot, I drench each pot with a 1 % solution of "Nickel Plus" to prevent the development of nickel deficiency. A lack of nickel in the potting media is the reason so many container grown pecan trees develop symptoms of 'mouse ear' disorder.
    
    Air pruning the taproot requires that tree pots must be placed on a raised, wire-mesh potting bench. I have used ½ inch hardware cloth tacked onto a wooden frame built with 2x6 treated lumber (photo at left). I raised the bench to a comfortable working height by placing the wooden frame up on concrete blocks.  I planted my seeds around May 1 when temperature finally started to warm up. I set a single nut (on its side) in each pot about 1 inch deep into the potting soil. To make handling the small Anderson pots easier, I use an Anderson deep flat that can hold 25 pots (photo at left). These flats have a very open bottom that holds the pots in place yet preserves the air pruning feature of the open bottom pot.
   One of the disadvantages of using a very porous potting soil is that you will need to water the trees every day. I make sure to completely soak the soil at every watering. During the heat of the summer (temperatures above 94) water the trees in the morning and in mid-day to keep tree roots from over-heating. Heat damage to the roots can be recognized by the appearance of a marginal leaf burn on the foliage.
    I've found that placing my potting bench under the partial shade of two large oak trees has also helped me avoid problems with summer heat. When placed in direct sunlight, the black pots used for growing trees will absorb a lot of the sun's heat causing soil temperatures to rise well above the ambient air temperature. With the combination of partial shade and ample water, I am able to keep tree roots healthy in throughout our Kansas summers.
 I never try to over-winter the seedlings I grow in containers. Pecan roots will die if exposed to temperatures of less than 19 degrees F. Although preventing cold injury to potted trees is possible, I find it more hassle than its worth. I will transplant all my container-grown trees into the field starting October 1st or as soon a soil conditions allow.

Monday, June 24, 2013

Watching casebearer larvae work

   
Two nuts have been destroyed by a single casebearer larva
    Pecan nut casebearer larvae continue to feed on pecan nut clusters. This morning, we found 5.3% of nut clusters infested with a casebearer larva in untreated plots. The larvae are starting to move into a second nut in the cluster (photo above right).
    If you look carefully at the photo, the full story of how these pecans were destroyed is revealed.  The smaller, brownish nut at the bottom of the photo was attacked first. As soon as this nut was damaged by the casebearer larva, the nut stopped enlarging and began the process of aborting from the tree. By the time this photo was taken, the damaged nut had formed an abscission layer and had separated from the stem.  With great foresight, the casebearer larva wisely attaches the nut to the tree with several strands of white silk. This prevents the nut from falling to the ground and allows the larva to remain in the tree. Since one pecan is not enough to satisfy all nutritional needs of a growing caterpillar, the casebearer larva moved to the lowest nut in the cluster and began tunneling inside. You can tell that the caterpillar had grown larger in size by the time it got to the second nut because the pile of frass (i.e. insect poop) at the base of the nut is larger and more coarse.

    There are times when a casebearer larva never finishes it meal of pecans. In the photo at left, two nut were destroyed by a casebearer. Judging from the size of these damaged pecans, the larva should have attacked the third and final nut in the cluster. However, it looks like an insect predator might have gotten to the casebearer larva before it could attack the third nut. During my survey this morning, I spotted several wheel bugs actively searching the pecan canopies for insect prey. Casebearer for breakfast--what a lucky wheel bug!

Friday, June 21, 2013

Casebearer damage at 3.3%

   
The entire nut cluster can be destroyed by a single casebearer larvae
    We scouted our "no-spray" native pecan grove today and found 3.3% of the nut clusters infested by pecan nut casebearer larvae. The warm, dry weather we are currently experiencing has caused insect development to move quickly. All northern pecan producers should be carefully scouting their orchards at this time. The window for effective economic control of this pest is rapidly drawing to a close.

Thursday, June 20, 2013

Summer pruning last year's bark graft

 
    During the spring of 2012, I top-worked a large pecan tree.  Earlier this spring, I trimmed the graft union and pruned the tree when it was still dormant.  Last week it was time for summer pruning.
    Like most trees that have been severely cut back for top-working, this tree was sprouting new shoots everywhere (photo at right).  My goal for summer pruning is to remove unwanted shoots and to direct the growth of remaining shoots to help re-establish a strong central leader tree.
   
    My first step was to cut out all of the sucker growth (photo at left). Already you can see a big difference. The trunk and the graft union are now visible. On all the branches below the graft union, I also removed  suckers that were growing straight up from the upper side of each lower limb. 
    I next turned my attention to trimming back the growth
of the lower branches below the graft.  I cut back these limbs both in height and length (photo at right). These cuts really helped to define the graft as the central leader of this tree.
    Now it was time to turn my summer pruning attention onto the graft. In the photo at left, you can see that the scion is still only about 1/2 the diameter of the stock. This means I need to keep the scion firmly tied to a stake to prevent wind damage. Also notice that the side limbs growing from the scion have all formed nice wide branch angles. That didn't happen by accident. Remember, I removed all the stalked buds from this scion last summer.
       At the top of the scion, the tree has created a profusion of new growth that gives the tree a "lolly-pop" shaped appearance. It time to prune using the 2-foot rule.
      The photos at left shows the branch structure of the "lolly-pop" portion of this tree before (left) and after (right) pruning. I selected one shoot to be the central leader and then removed all other side shoots within two feet of the leader's apex.  Lower side shoots, I left in place especially if they have good branch angles.

     To focus more of the tree's growth energy into the central leader, I tip pruned all lateral branches on the scion below the leader. The photos at right illustrate a lateral shoot before (top) and after (bottom) tip pruning. Whenever I tip prune, I always prune back to a outward growing bud as shown in the photos. 
    After summer pruning, I now have a tree with a clearly defined central leader (photo at left).  However, my work this summer is not done. I'll need to revisit this tree in about 3 weeks to remove any stalked buds and make sure the central leader stays on course.
    You can follow I each step I took last year to apply this graft and to train the scion to become the tree's new top. Here's links to last year's posts.

1. Top working with a bark graft
2. Bark graft bursting
3. Training a new bark graft
4. Summer training a bark graft
5. Painting a bark graft
 

Wednesday, June 19, 2013

Casebearer update 19 June 2013

 
    We found 1% nut entry by first summer generation pecan nut casebearer larvae this morning.
We captured 2 additional moths in all 5 of our pheromone traps. I looked at the weather forecast early this morning and discovered we would have good conditions for spraying today (low wind, temperatures below 85 and little chance of rain). Besides applying an insecticide we also made our first application of a fungicide to control pecan scab.

Tuesday, June 18, 2013

Catkins and pistillate flowers on a new graft

  
   I was checking the progress of new grafts the other day when I came to a Kanza scion that had not only broken bud but was producing flowers (photo at left). Flowering on a scion is not that uncommon and occurs most frequently when using scions collected from vigorous growing trees of highly productive cultivars.
   Buds on the scion were programed to produce flowers last August, long before the scion was cut from the parent tree.  Catkins production has little impact on shoot growth but pistillate flowers can slow new shoot elongation significantly.
  
   Whenever I find a pistillate flower cluster on a first year graft (photo at right), I use my fingers to pitch off the entire cluster.  With the flowers removed, the scion can get back to growing a new central leader for my tree. I should get at least 3 feet of new top growth on this bark graft this summer.

Monday, June 17, 2013

Casebearer update 16 June 2013

    Today we found the very first pecan damaged by a pecan nut casebearer larvae. If you look carefully at photo at left, you will see a small pile of insect frass near the base of the nut on the left side of the cluster. Pecan nut casebearer larvae always enter on the upper side of a nut close to the point where the nut is attached to the peduncle. When scouting for PNC damage look for the pile of frass along with some fine white webbing the insect strings between nut and peduncle.
  
     In addition, we are still catching moths in our pheromone traps (data below). Based on today's findings we are planning to spray our pecan trees for PNC and pecan scab starting on Wednesday the 18th of June.

Friday, June 14, 2013

Casebearer Update 14 June 2013


    We scouted our pecan trees for signs of casebearer (PNC) activity again today. As of today, we have yet to find nut entry by any first generation larvae. We are still catching male moths in pheromone traps (data above) but the numbers seem to be dropping off. Pecan nuts are just starting to show signs of enlargement indicating that the PNC egg laying period is rapidly approaching. At this point, we are preparing our sprayers to apply this year's first spray sometime next week. Monday's scouting report should help pinpoint an optimum spray date.   

Thursday, June 13, 2013

Answering pruning questions

   Training young pecan trees is one of the most popular series of posts on this blog.  Many pecan growers have used my directive pruning techniques and had excellent results. But, all your pruning questions have not been answered. Recently, I've received photos from a couple of pecan growers seeking additional pruning advice. Rather than just respond to each grower individually, I've decided to share those photos on this blog so everyone can benefit from additional pruning examples.
    I received a photo of a young pecan trees with the simple question--" How should I prune this tree?" (photo above, right).
    At some point in the past, the top of this tree had been pruned off leaving a 2 inch stump and no strong central leader. Currently, this tree needs more training than actual pruning. First, I'd start by cutting off the stump at the top (cut marked in blue). Next, I'd drive a wooden or steel post next to this tree. With the stake in place, I would tie the uppermost branch to the stake, holding it in an upright position and forcing it to become my central leader (the future tree trunk).
    If you look carefully at this upper branch, you will note that side shoots are starting to develop (see area in the red oval above). Here's where you practice the 2-foot rule by removing all side shoots along the upper 2 feet of the central leader.
   The final step in training this tree is to slow the growth of the lower side shoots. I simply pinch out the growing point from each shoot using my fingers.  This should push more of the tree's growth energy into the central leader yet maintain a healthy level of foliage on the tree.
   
   The next pruning question concerned choosing a central leader. Proving that I'm not the only one that can use a computer to label things in a photo, this grower asked- "I believe the central leader should be 'A' but the other shoots marked 'B' and 'C' are out growing the assumed central leader. Should 'B' and 'C'  eliminated or pruned back?" (photo above).
    The quick answer is: 'B' and 'C' are leaves and not competing shoots. Don't prune them. The reason they are taller than the terminal of the central leader is because these leaves are older than the leaves at the terminal and thus more fully expanded. (By the way, I love the deer cage).
  
    This confusion between what is a leaf and what is a shoot gives me the opportunity to give a breif lesson in pecan botany. Pecan trees create what are known as pinnately compound leaves (photo at right). Each leaf is made up of 9 to 17 leaflets attached to a stem-like rachis. The base of the rachis is also known as the leaf's petiole. An axillary bud is found just above the connection of petiole and stem. Each fall, the tree sheds entire leaves including all leaflets and rachii.  The only thing left behind will be axillary buds and a heart shaped leaf scar below each bud.
   
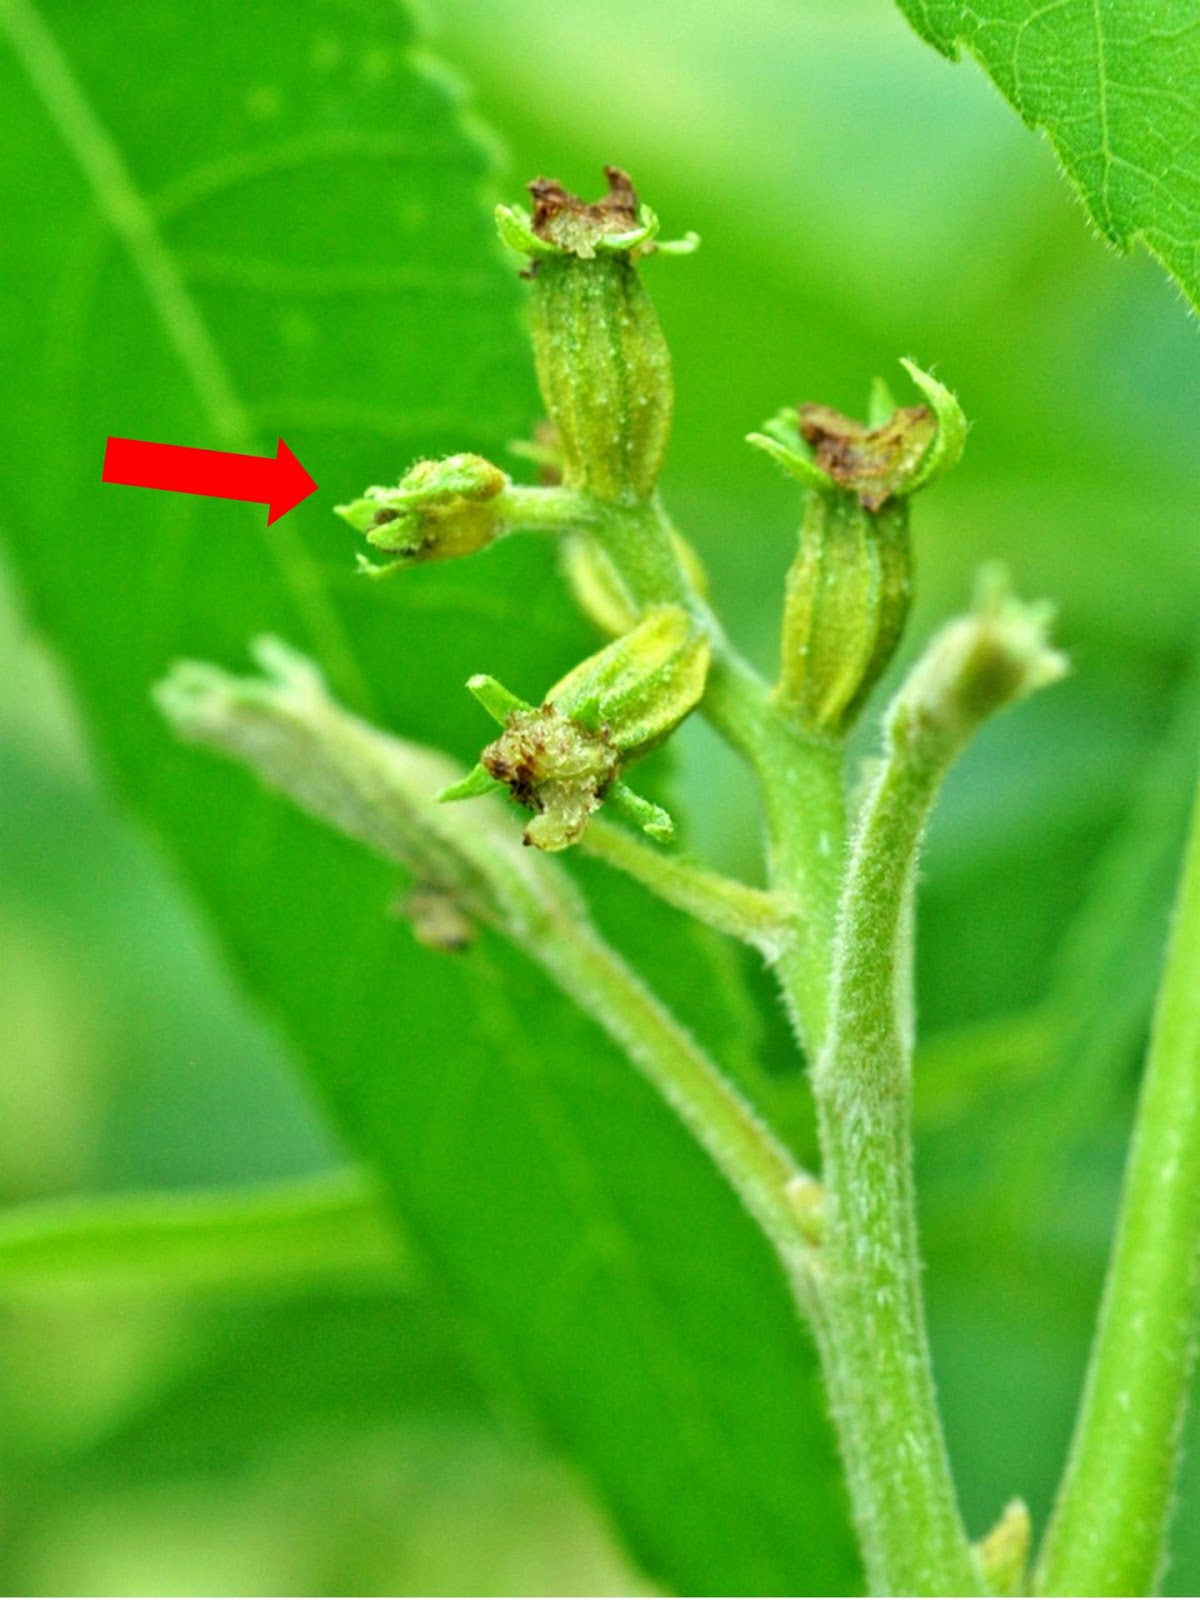
    In training a young tree, you should keep your eyes on the axillary buds developing on the central leader. By early summer, stalked buds often form on a vigorously growing central leader.  The photo at right was taken this morning and a stalked bud has already formed (inside yellow oval). Allowing a stalked bud to develop into a branch creates all kinds of tree structural problems. Pinch off these stalked buds as soon as you see them. Not only will you prevent future tree branch angle problems but you will further stimulate the growth of the central leader. 

Wednesday, June 12, 2013

Watching for Pecan Nut Casebearer

    Today, I was looking for signs of pecan nut casebearer activity. Over the last week we have been capturing a fair number of male moths in our pheromone traps (see table below) but it seems too early for the females to start laying eggs.  I my experience, casebearer females wait until the nuts become fertilized and nut expansion begins before they lay eggs on the tip of a young nutlets.  The photo above was taken this morning and shows a cluster of Kanza nuts. These nuts have been pollinated but the pollen tube is still growing towards the ovule and the nut has not yet become fertilized (see pollination vs. fertilization). So, we will continue to watch and wait.

Friday, June 7, 2013

Catching pecan nut casebear moths

  
    We set up pecan nut casebearer (PNC) pheromone traps after last weekend's flood receded (photo at right, arrow points to trap). However is wasn't until we got a warm night (above 60 degrees) that we found large numbers of male moths in the traps the next morning (Thursday June 6).
  In setting out PNC pheromone traps, I like to place the trap as high up into the tree as possible. To make checking traps a ground level operation, we use a rope and pulley system to raise the trap up into the tree's canopy and to lower it for counting moths.

    The photo at left shows the simple pulley system we use for hanging traps. We start with a 2 foot piece of 3/8 inch steel rod and bend it into the shape of a huge fish hook. At the long end of the steel hook we drill a 3/16 inch hole then place a loop of "bailing wire" through the drilled hole. The wire loop acts as our pulley for the braided nylon cord used to raise the trap up into the tree.
   The steel hook is placed over a limb using a 20 foot long piece of 1 inch diameter PVC pipe. I start the installation process by threading an ample amount of nylon cord through the wire loop on the end of the hook. I then place the long end of the hook inside the pipe (with cord hanging out). Lifting the pipe upright, I place the hook over a tree limb. This will get the trap about 25 feet up into the canopy, a height where PNC moths are actively flying.  To hold the cord in place and the trap high in the tree, I pound a nail into the trunk of the tree and tie the cord to that nail.
   

    The photo above is an example of one of our pheromone traps. We use a trap that has a plastic top and cardboard bottom.  We've found the plastic top helps to make the trap more rain proof.  The cardboard bottom is covered in a sticky substance that ensnares male moths as they enter the trap. The little grey stopper inside the trap is what contains the PNC pheromone. This trap had captured 16 moths.
  
Here's  a close-up of a PNC moth caught in a trap (photo at right). The casebearer moth is small, grey and cigar shaped. However, PNC moths have a distinctive ridge of scales across the upper third of their forewings. You might find other insects caught in the trap but only PNC moths will have that ridge of scales.

Thursday, June 6, 2013

Last of the catkins falling

Oswego catkins still hanging on
   Our pecan grove is still covered in a layer of slime courtesy of last weekend's flood of the Neosho River. Yesterday's rain only added to the mucky mess. However, the sun popped out today and I took the opportunity to check on pecan flowering. At this point, it all of our pistillate flowers have been to be pollinated. The catkins on protandrous cultivars have dropped off long ago. Catkins on protogynous cultivars are still hanging on the tree but have fully released their pollen (photo above). 
    I like to keep track of catkin fall because it keeps me in tune with the progress of  the season.  Over the years, I've found that pecan nut casebearer larvae begin their attack on pecan nut clusters about 5 days after the last catkins drop from the latest pollen shedding trees. So, by watching catkin fall I know exactly when to start scouting for casebearer.   

Wednesday, June 5, 2013

Phomopsis trunk galls on pecan

   
     Every once in a while, I come across a native pecan tree with a baseball-sized, woody gall growing on the side of the trunk (photo at right). Look carefully and it doesn't even look like the gall is firmly attached to the tree. In fact, a sharp blow with your hand or hammer will usually pop the gall right off the tree.
    This gall is caused by a slow growing fungus in the genus, Phomopsis. The woody gall is formed by the tree's natural wound response to fungal attack. To prevent wood decay, pecan trees try to grow over and seal out invading fungi. However, in the case of a Phompsis gall, neither tree nor fungus seem to gain the upper hand in the wood decay battle. As a consequence the gall just grows larger.


   I knocked this gall off the tree with just the palm of my hand (photo at left). This was a fairly unique gall in that it represented the fusion of two infections into one elongated gall. Phomopsis infections usually start at a single point, most often at the site of a small broken off limb. In the photo, the yellow arrows point to the infection points of this double gall.
   Looking at the underside of the gall, (held in my hand) you can see that the woody gall is composed of a jumbled up mix of bark, wood, and fungus tissues. You can also see that this gall  actually started off as two round galls that later fused together when they began to touch.
    Phomopsis galls are not that hard to find in native pecan groves and they seem to have zero impact on nut production. 

Tuesday, June 4, 2013

Sprouts from a drought-injured pecan tree

   Last summer's heat and drought was hard on a lot of plants including young pecan trees. This morning, I photographed a tree that I had grafted two years ago (photo at right). I was so disappointed; I lost almost the entire top of the tree to drought-induced die-back. This tree had been growing great, with over 4 feet of new top growth added just last year.  But if you look at the tree now, all you will see is a few new sprouts growing from the base of the tree.
     The photo below is a close-up of the sprouts that are now growing from the tree's base. Notice that the sprouts seem to come in one of two different colors. The sprouts with a reddish tinged leaves are growing from the rootstock portion of the tree (below the graft). Red pigmentation of expanding new leaves is a juvenile characteristic of a seedling pecan tree.
   

    The bright green sprouts have developed above the graft union. The all-green color is indicative of sexually mature tissue and tells me that these sprouts originated from the Kanza scion. 
    Now, the tree training process must start all over again, but this time with a twist.  First, I removed all the sprouts with red colored leaves. Next, I pruned off all but one of the green "Kanza" sprouts in an effort to restart a central leader. For the time being, I left the dead portion of the old trunk in place to act as a training stake for the new shoot. To keep this tender shoot from being broken off by a wind storm, I used grafting tape to tie the shoot to the old trunk.
    I'll cut the dead portion of the old trunk out in mid-summer once the new shoot has developed a woody stem of its own.  However, this tree will still need staking. Until the pruning wound is completely healed over, this tree will be prone to wind breakage at the point of connection between new central leader and older trunk.  Once I remove the dead stem, I'll use an eight foot long piece of steel conduit (3/4 inch tubing) as a stake for tying  at the new leader.
    After pruning I installed a deer cage around this tree. In the photo above, you can see that a deer had already sampled the succulent new growth sprouting from this tree.  With all the root energy pushing my new central central, I should see at least 5 feet of new growth this summer. If the deer, were allowed free access to this tree, I'd end up with a 2 foot tall pecan bush.


Monday, June 3, 2013

Natural crop load regulation during bloom

   
    Many pecan growers like to blame poor weather conditions during the pecan pollination season for a poor nut set. This happens whenever they see a developing nut cluster that has one or two flowers shriveled up and ready to drop off (red arrow points to 2 aborted flowers in the photo at right). Got to be poor pollination right? Wrong--its more often the case that the flowers aborting at this time of year were weak or poorly formed way back when the flower cluster was first created. Even if pollen lands and germinates on the stigma of a poorly formed pistillate flower, that flower is not strong enough to complete the fertilization process and will drop from the tree.
   
    In the photo at right, the red arrow points to a small, misshaped pistillate flower. This flower will never form a pecan and will eventually abort at the end of the pollination season. Note that this weak flower is located at the very terminal of the flower cluster. When a pecan tree develops pistillate flowers in the spring, the first flowers formed are found at the base of the flowering stalk (also known as the peduncle). As the flower cluster continues to grow, more pistillate flowers are formed along the peduncle. Eventually, the tree runs out of reproductive steam often resulting in the formation of small, weak flowers at the terminal of the flower cluster.
   The reproductive energy needed to create female flowers each spring is determined by the previous season's nut set and the tree's overall vigor. An excessive crop load one year is often followed by a year of weak pistillate flower formation (hence pecan's tendency towards alternate bearing). Drought, excessive flooding, lack of soil nutrients, insects and diseases can all put stress on a tree and reduce the strength of flower formation the following spring.
   So next time you start blaming poor pollination weather on your lack of pecan crop, think back to what happened last year. Did you do everything possible to ensure healthy tree growth?  

Saturday, June 1, 2013

Flooding and new grafts

  
    Flood water  from the Neosho River has backed up over the county road and covered a portion of my young pecan grove. Two weeks ago, I grafted several young trees in that field and I was curious to see how much of each tree was submerged in the flood. In the photo at right, you can see one of my bark grafts with all the wraps poking up through the water.  Its a good thing this graft union was not submerged in flood water. Over the years, we've learned that if a graft union is covered by flood water before the scion has callused into the stock, flood water will kill the graft. If the graft has healed and new growth had emerged from the scion, a new graft can often survive flooding (the sprouted primary bud often dies if submerged but secondary buds break on the scion once the flood recedes).
   This picture was taken during the river level's predicted high point. Hopefully, this graft will survive and sprout new growth shortly. The good news is that all the other grafts I made this year were even higher out of the water than the one in the photo. And I've learned a valuable lesson during this flood, my tree's deer cage will also serve to keep pesky beavers at bay.