Wednesday, November 10, 2021

Pecan harvest 2021: A view from the tractor seat

        This past week, I had the pleasure of starting the 2021 pecan harvest. Surprisingly, we still haven't experienced a killing freeze so split-open shucks are still green which has slowed the nut drying process (photo at right). However, our customers are clamoring for new-crop pecans so I decided to get an early start harvesting. These early harvested nuts will just need to dry down further inside a warm and dry barn.


     Back when I worked for K-State, I was able to photograph one of my employees operating the machines we use for pecan harvest. On my own farm, I'm a one man operation, so my view of harvest is confined to the seat of a tractor.  The first step in harvesting pecans is to shake the nuts out of the tree using a 3-point hitch mounted pecan shaker (photo at left). I hydraulically clamp the shaker onto the trunk of the tree then engage the power-take-off to rotate weights inside the machine. The moving weights create a back-and-forth motion which vibrates the entire tree. It only take a few seconds before nuts start raining down to the ground.
 

    When I purchased my shaker I was sure to get one equipped with  donut pads rather than hard rubber pads. With the super-thick donut pads I'm able to shake trees  when they first start cropping  (photo at right). With a tree as small as the one pictured at right I go easy on the throttle and give the tree just a few short bursts of light vibration.

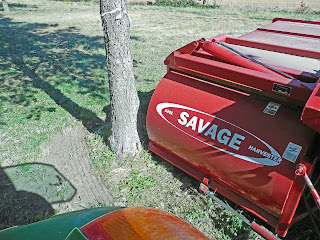
Once I've shook a good number of trees, I hop into my picking tractor. I use a Savage pull-type pecan harvester to sweep pecans up from the ground (photo at left).  When harvesting pecans I always start outside the drip-line of the tree's canopy and work my way towards the trunk. One important thing to remember when operating a Savage harvester is that you can only make right-hand turns (a sharp left turn while the machine is running will break drive-line bearings).

   When I'm harvesting, I sit sideways on the tractor seat so I can keep my eye both ahead and behind. I've found that I've got to especially watch the front right corner of the harvester. To harvest as many pecans as possible, I need to steer as close to the trunk as I can without ramming the machine into the base of the tree. Since the harvester trails well outside of my right rear tractor tire, learning how to avoid hitting trees take a little practice.
    Once I've filled the hopper on the harvester with pecans, I'll drive up to my barn and dump the nuts into my pecan cleaner. When conditions are perfect for harvest, I'll keep harvesting during daylight hours then switch over to cleaning when the sun goes down.  Needless to say, I put in a lot of long days during the harvest season.


Monday, October 18, 2021

Fall pecan tree planting


     Earlier this month, I drove over to Elsberry, Missouri to see my friends at Forrest Keeling Nursery and to pick up some of their container-grown pecan seedlings. This week the weather has been perfect for planting those trees.

    The first step in planting a container-grown tree is to dig a hole about the same depth as the pot (photo at right). I also dig the hole larger than the diameter of the pot which ensures that I have plenty of room to pack soil around the root ball.


      When planting container-grown pecan trees I always check for circling roots that have grown at the bottom of the pot (photo above). Allowing these roots to remain in a tight circle can cause major problems for the tree as it becomes re-established in the orchard.  As the tree grows these circling roots can grow to girdle each other and cause slow tree decline.


    Before planting the tree, I pull large circling roots away from the root ball and prune them off (photo above).  Once the tree starts growing in the orchard, new roots will form at each pruning cut. These new roots will grow straight downwards into the soil and eventually form multiple tap roots.


    Before setting the root ball in the hole, I shake off all loose potting soil. This will expose a lot of the root system's fibrous roots and force them to grow into the surrounding soil (photo at left).  As I fill soil into the hole, I carefully pack soil all around the root ball. By shaking off all loose potting soil, the root ball appears to sit about 1 to 2 inches below the surface of the soil. Once I've filled in all around the sides of the root ball, I'll cover the root system with a 1 to 2 inch layer of soil. Covering the root ball with my native silt loam soil will slow water evaporation from the potting soil that's still clinging to the tree's roots.

     I've learned that these container-grown trees are extremely attractive to deer for browsing. In the past, I've even had deer pull a freshly planted tree out of the ground.  So before moving on to planting another seedling pecan tree, I cover the tree with a cage made of 4" x 2" welded wire fencing that is 4 feet tall (photo at right). To hold the cage in place, I tie it to a steel fence post. You might also note that I used all the loose potting soil that I removed from the root ball as a mulch for the tree. 


Saturday, October 16, 2021

Fall fertilization: Fertilizer prices have skyrocketed!


     This past week I applied my regular fall mix of fertilizers to my pecan grove-- equal parts of urea, di-ammonium phosphate,  and potash. I am a firm believer in fall fertilization for reducing alternate bearing of pecan trees, but this year, I was shocked by the price I had to pay.

    Late last Spring the price of fertilizer and pest control chemicals started to rise. Prices continued to rise all summer and now, this Fall, the same amount of fertilizer that I applied in Fall on 2020 cost more than twice as much in 2021.  We've seen spikes in fertilizer prices in the past but I think this year must be setting a record for percent increase over the previous growing season.

  After getting over my initial shock, I realized that, if I want to keep my trees on the road toward increased nut production, I  had to invest in fertilizer even at inflated prices.  I've been growing pecans for 40 years and one thing that I've learned is that a consistent fertilizer program is the most important input that can be made to ensure annual nut production.

Sunday, August 22, 2021

Spraying for weevil control


     Its been a relatively dry summer this year so I decided to delay making my first weevil spray until after we got a good soaking rain. Well, during the early morning hours of August 21st we received our first good rain (0.96 inches) in several weeks. This rainfall event should allow pecan weevils to emerge from their underground cells and find their way to the nearest pecan nut cluster. The photo above shows both a female (longer snout) and male adult weevils.

   The first order of business for these insects is to move to a pecan nut cluster in the hope of finding a weevil of the opposite sex. After mating, the female will start puncturing pecans to discover if the nuts are suitable for egg laying. She will not deposit eggs inside the nut until the kernel inside has entered the gel stage.


    I cut several pecans open today and found that even early-ripening cultivars were still in the water stage (photo at left). As I mentioned in my previous post, pecan kernel development is much later than normal the year due to unseasonably cool Spring temperatures.

    The combination of a concentrated weevil emergence due a triggering rainfall event and a nut crop not ready for weevil oviposition means that weevils will just keep probing nuts until kernels start to firm up inside the shell. A pecan that gets punctured during the water stage will drop off the tree (both weevils and stink bugs cause nut drop).

    To prevent a possible significant amount of weevil induced nut drop, I decided to spray my orchard with and insecticide. In spraying the orchard, I started at dawn this  morning (22 Aug 2021) and quit around 10:30 am as air temperatures climbed above 85 degrees F. The forecast for tomorrow is afternoon temperatures in the mid 90's (F), so I'll be getting up early tomorrow morning to finish the job. 

    With cooler temperatures and high humidity, early morning is the best time for spraying. The water droplets that blow out of the sprayer stay airborne longer and do a better job at coating all the surfaces of the pecan tree's canopy. For this weevil spray I used Warrior II insecticide. I'll probably spray again in 10 to 14 days depending on soil conditions and rainfall patterns.    


Saturday, July 31, 2021

Checking pecan kernel development

     Its that time of year when I really start to notice the pecan crop hanging on my trees. The photo at right shows a cluster of Kanza nuts as they appeared 30 July 2021. At this point in the growing season, pecan nuts are in the phase of rapid fruit expansion  meaning that the nuts you see in the photo will almost double in size over the next 2 weeks.

   To check on the development of the kernel inside the nut, I took samples from several pecan cultivars and cut them open (photo at left). The kernels were less than one half expanded and still filled with liquid endosperm. Compared to previous growing seasons, this year's pecan crop is well behind schedule. An early maturing cultivar, such as Gardner, is usually at full water stage by the first week of August.  Since nut development is delayed this year, I expect pecan ripening (date of shuck-split) to be later than normal.

   If you remember back to earlier this Spring, we had a much cooler than average month of May. This lack of heat delayed the pollination season and slowed the embryo fertilization process. The net result has been that the normal biological clock for kernel development got a very late start.

   From a practical viewpoint, the delay in kernel development will impact the proper timing for crop load management and sprays for pecan weevil.  

Thursday, July 8, 2021

3-flap graft aftercare


     During the last week of June and the first couple of weeks of July, I try to visit every successful graft I made this year.  Pictured at right is a 3-flap graft made with a Kanza scion. The scion has made good growth but the rootstock below the graft has also sprouted several vigorously growing shoots. During this time of year, I like to prune off all rootstock sprouts and trim the scion down to a single shoot.

      Just by removing the rootstock sprouts, this graft looks to have made a good start towards growing into a strong central leader tree (photo at left). However, there remains a few more details that need attention.


    Earlier this Spring, the new shoot that sprouted from the scion terminated in a pistillate flower cluster (photo above left). The development of a flower cluster temporarily slowed the grow of the shoot but the terminal vegetative bud adjacent to the flower cluster eventually broke and started to grow. To promote the growth of that vegetative shoot, I pruned off the flower cluster (photo above right).

       In trimming the scion down to a single shoot, I made two additional cuts. The first was to remove a shoot developing from the secondary bud just below the main new shoot. And the second was to remove the stub above the new shot. By making an angled cut, I will encourage the rapid healing over of the cut at the top of the scion.

    To prevent the graft from becoming girdled by the grafting tape used to make a 3-flap graft, I remove all wraps from the graft at this time of year. Once the tape is removed you can easily see the flaps tightly attached to the scion (photo at right). You will also note white callus tissue growing in the cracks between the flaps. Also notice how this callus tissues causes the graft union to swell especially near the base of the graft. This is normal for 3-flap grafts. In a few years, the swelling at the graft union will disappear.

    Rapidly growing callus tissue is very susceptible to  sunburn and requires protection. To block the sun, I re-wrap the graft  union with aluminum foil and tie it on with grafting tape (photo at left). The grafting tape is tied just tight enough to hold foil in place so it can't be blown away by the wind.


    The final step in mid-summer graft care is to tie the new scion shoot to my tree training stake (photo at right). I use flagging tape to gently hold the shoot in place. Tying  the scion will prevent shoot breakage that can occur during strong summer storms.  The wire cage seen in the background of this photo will be placed over this young tree to prevent deer damage.


Saturday, July 3, 2021

Weather dictates disease and insect control measures


    During the last 5 days of June it rained every day for a total accumulation of over 5 inches. With all that rain, the Neosho river spilled over its banks and flooded my pecan grove. The excessive moisture provided excellent conditions for the spread of pecan diseases but I was forced to wait until the flood receded before starting up the sprayer. While waiting to spray a fungicide,  I also noticed several colonies of Japanese beetles (photo at left) starting to feed on pecan leaves. 
      Japanese beetle has been a pest in the US for also 100 years and has moved slowly westward across the continent. For SE Kansas, Japanese beetle is a new pest that I first noticed only 5 years ago. This year, the beetle population has grown large enough to present a significant threat to pecan foliage.
 
   The damage on pecan is easily spotted high in the tree's canopy. Beetles feed on foliage in large groups leaving areas of tree canopy with a lace-like appearance (photo at right). This photo was taken a few hours after an insecticide and fungicide application so the beetles are gone but evidence of their activity remains. I just wish I had a way to capture the wild buzzing of beetles around the tree when I hit them with the air-blast sprayer. While driving the sprayer a blistering 1.9 MPH, I was able to get a pretty good feel for the large number of beetles that had been feasting on my trees. 
   During the morning of spraying, I also noticed a single fall webworm colony (photo at left). The insecticide I used to control Japanese beetle will also kill the larvae inside this single web. However, the appearance of this webworm colony serves as a reminder that I will need to stay vigilant with my pecan pest scouting efforts.
    Starting at sunrise this morning (3 July 2021), I sprayed my orchard using Quilt fungicide and Mustang Maxx insecticide.


Monday, June 28, 2021

Scouting for pecan pests

    Every year I have inspected hundreds of pecan nut clusters in early June to determine the date of first significant nut entry by pecan nut casebearer. Casebearer has been a perennial insect pest that can destroy an entire nut clusters shortly after pollination. However, I have searched all month and could not find a single nut damaged by the feeding of a pecan nut casebearer larva (photo above). In fact, my trees look clean of all insect problems at this point (no webworms or walnut caterpillar)

   As part of my regular scouting routine, I always visit some large native pecan trees in a cemetery just across the road from my home. These trees are never sprayed and provide me with an opportunity to see pests develop unchecked during the growing season.


   This past May was cooler and wetter than normal and by the first week in June I found pecan scab infections on native pecan tree leaves (photo at left).   The black spots that dot the leaflets and leaf rachis seem like a minor infection but theses scab lesions will provide provide enough spores to cover young developing nuts with scab lesions. Scab infection early in the nut expansion phase (late June - early July)has the potential to causes serious yield loss.

    Since last Saturday (26 June 2021),  we have entered an extended rainy period that promises to provide ideal conditions for the spread of pecan scab (rain every day for 6-7 days). In my orchard, I gave up waiting for pecan nut casebearer scab and applied a fungicide for disease control back on June 12th. These trees will need a second fungicide spray as soon as I can get in the field and apply it. I'll spray all my trees, even scab resistant cultivars like Kanza. In the past, I have found that the secondary diseases that cause early defoliation usually get their start during mid summer wet periods. By keeping healthy leaves all season long, I canl ensure a good return crop in 2022.    

Wednesday, June 16, 2021

Directive pruning is most effective way to train young trees


     One rainy day in May, I was leafing through my pecan magazines when I came across a photo of a Georgia Extension agent discussing the pruning of a young tree (photo at right). To me, this one photo illustrates many of the worst possible approaches to young tree training. The first thing I noticed was that far too many lower limbs have been removed during previous years. Lower limbs are vital for stimulating trunk diameter growth (making a strong  trunk) and provide valuable leaf area to promote root growth. The second obvious problem was loss of a central leader and the development of a crow's foot at the top of the tree. Dormant pruning can be used to correct a crow's foot branch pattern with the selection of a single shoot to become the new central leader but when that new shoot breaks bud in the spring, a new crows foot will develop 3 feet higher in the tree. 

    I have discussed my approach to training young pecan trees is a series of blog posts published 10 years ago in this blog (Series starts HERE). Starting in mid-May and continuing through early June, I've been pruning my pecan trees using my directive pruning methods. This blog post is dedicated to illustrating the summer pruning cuts I make to direct a pecan tree's growth to ensure I create a well branched central leader tree.

  The photo at left shows the typical budbreak pattern of a young grafted tree. The graft union is painted white with the majority of new shoot growth clustered at the top of the tree. At this point, this tree would create a fabulous crow's foot if allowed to grow unchecked.


    My first pruning decision was to choose which new shoot would become the new central leader. Last spring's late frost killed several emerging buds (seen as brown dried-up buds in photo at right) which promoted a profusion of new shoots to grow near the top of the tree. One new shoot was growing more vigorously than all the others (yellow arrow) So I choose that one shoot to become my new leader.

    With a single pruning cut, my young tree was poised to grow a strong central leader (photo at left). However, several rapidly growing shoots just below the new leader were still in position to create unwanted competition for the leader.  


    Following my 2-foot pruning rule I pruned off any shoots on the main trunk that could possibly complete with the central leader (photo at right).  I left lateral shoots growing lower down on the trunk to help build a healthy canopy of new shoots and leaves to promote trunk diameter growth and rapid root growth. 


    With just a few summer pruning cuts, I directed the growth of this young tree into a more desirable tree shape (photo at left). I'll need to come back to this three in mid summer to remove any shoots developed from stalked buts and to tip back the growth of laterals.  


When summer pruning my trees I look for trees that have developed what what I like to call 'lolly-pop' tops. The photo at right is typical of this kind of growth. What you are actually seeing is the early stages of the 'crow's foot' growth pattern.


    Using my ladder, I climbed up to take a close look at the top of the tree (photo above). In typical fashion this tree developed multiple shoots at the tree's apex. To re-establish a central leader, I pruned off all competing shoots leaving just one to become dominate. What I'm actually doing is pruning out a crow's foot while the shoots are still growing upright and before they start spreading out laterally in all directions (to form the typical crow's foot).  

    Pruning in the summer has the advantage of removing far less wood material than what is common with dormant pruning. The green shoots I prune off can be left on the ground to be chewed up when I mow the grove.

    By pruning out the 'lolly-pop' I have recovered a single central leader (photo at left).  However, my summer pruning efforts on tree are not finished.

    On this size tree, I tip prune new lateral shoots once they have grown about 2 feet in length. This slows extension growth and encourages shoot diameter growth. When pruning lateral shoots, I always prune to an outward pointing bud (photo above). I also remove any new lateral shoots that are pointing straight upwards.


Monday, May 17, 2021

Pecan pollination underway

Kanza catkins and new growth
    During mid-May I scout my pecan orchard for the intensity of pistillate flower production on new branch terminals. If I find a flower cluster on nearly every shoot, I expect a good nut harvest come this fall.

   The amount of catkins produced by a tree has no bearing of the nut crop produced in the Fall. Although large amounts of wind-blown pollen is necessary to fertilize a large pistillate flower crop, there never seems to be a shortage of fine yellow pollen grains floating in the breeze during the month of May (in our area).

Kanza pistillate flowers
     Pecan pistillate flowers (female) are found on the very terminal end on the current seasons new growth. Each flower in the cluster has a prominent stigmatal surface that is designed to capture pollen grains out of the air. Each stigma has two horns and features a very rough surface. The stigmas of Kanza flowers are green. However,  stigma color among pecan cultivars can varyfrom green, to orange, to red. Since insects are not required for pecan pollination, stigma color has no impact of pollination success. 


Pecan trees have one of two flowering habits. Trees that release pollen before their female flowers become receptive, have a protandrous flowering habit. Trees that produce female flowers that are receptive to pollen before they release their own pollen are termed protogynous.  Today, I found several protandrous cultivars had started releasing their pollen. You can tell pollen is being released because the pollen sacs on the catkins have split open and are turning brown. Gardner pecan, as seen in the photo above, was  releasing pollen today.  

    Pecan trees have developed this dichogamous system of  flowering to prevent self pollination and inbreeding depression.

    If you would like to discover the flowering type of your pecan trees, simply collect some catkins from each cultivar. The first thing you will notice is that catkins are produced in clusters of three. Even before pollen release you can identify flowering type by the shape of the catkins produced. Catkins of protandrous cultivars are short and fat while the catkins of protogynous cultivars are long and narrow (photo at left).

Monday, May 10, 2021

Grafting a frost injured tree

    In spite of a cooler than normal Spring, my pecan trees have started to re-bud following the April 21 frost. The photo at right show the terminal of a young pecan tree that is pushing out new green shoots from secondary buds just underneath frost-killed primary bud shoots. This was the signal I was waiting for to start grafting again.

   In choosing trees to graft, I select young trees that have made vigorous shoot growth the previous growing season. The tree pictured at left was about 6 feet tall and a perfect size for bark grafting. 

    When folks are just learning to graft pecan trees, they often wonder if there is a proper height to make the graft. When I graft, I choose the height based on two criteria. The diameter of the stock should be no larger than 3 inches in diameter and height should comfortable for making grafting cuts. On smaller trees, like the one pictured here, I'll cut off the stock at about 18 inches off the ground or at perfect height for me when sitting on my cooler to graft. On larger trees, I'll cut the stock at chest high to make grafting while standing more comfortable. Either way, I always remove at least 2/3 of the stock tree's height to force the tree to accept my graft.

    Once I choose the approximate location for cutting the stock, I carefully inspect the trunk for any a major knots or pruning wounds. On the tree I've selected to graft, I found two pruning wounds on either side of the trunk (photo at right). Underneath those wounds, the bark was nice and smooth, an excellent site for bark grafting.

    To make scion insertion under the bark easier, I cut the stock just below the two pruning wounds (photo at right).
    
    Once I prepare the stock by making a vertical incision in the bark, I turn to carving the scion. The photos at left show the cuts I make into the scion. The first cut is a deep cut to narrow the width of the scion to allow it to slip under the bark of the stock. Next, I make a shallow cut to expose the cambium on the back of the scion. This cut is made at an angle to deep cut. At a right angle to the deep cut I peel away a sliver of bark to expose cambium along the edge of the scion that will abut the verticle incision I made in the bark. My final cut is to carve a chisel point into the end of the scion to facilitate insertion under the bark. A detailed description of this grafting method can be found HERE.
  

  Once the scion is prepared I can quickly insert it into the stock and staple it into place. First, I place a row of staples up the incision of the bark. These are places at an angle so both sides of the staple sit firmly against the bark. Then I place a verticle row of staples just to the left of the scion to press the stock's bark up firmly against the shallow cut I made on the backside of the scion.
 

   To complete the grafting process, I wrapped the graft union in aluminum foil then covered that wrap with a plastric bag tied both on the scion and the stock (using green tape). I placed a drop of white glue on top of the scion to seal in moisture then attached a bamboo stake to the tree with electrical tape to prevent bird damage and provide support for the growing scion. My final step was to label the graft with an aluminum tag imprinted with the cultivar name.


     When completed, my grafted tree looks tiny compared to the stock tree I started with. In the photo at right, I layed the severed top of the tree next to the graft to give you an idea of how much I pruned off.  This may look like drastic surgery but when this graft takes, the new shoots will grow rapidly attemping to replace all that wood I pruned off. In addition, a fast growing tree is easier to train to central leader.


Sunday, May 2, 2021

Grafting after a late season freeze

     Most years I start grafting pecan trees around the first of May. The photo at right shows a young seedling pecan tree that is the perfect size to graft using a 3-flap graft. For field grafting, I use growth stage as a gauge for when grafting will be most successful. The tree in the photo has new leaves just starting to unfurl. The emergence of new leaves tells me that the bark will easily slip which is so important for 3-flap grafting.

    After 40 years experience in grafting trees, the first graft of the season went on perfectly (photo at left). If you need a refresher on how to make a 3-flap graft check out my post HERE. As always, I placed a bamboo stake next to the graft to provide a bird perch (prevents graft breakage from birds) and a support stake for the new growth that will emerge from the scion.


    However, much of my grafting will be delayed by the freeze we suffered on April 20. The photo at left shows one of many young trees that had their emerging buds frozen by the cold. The cold temperatures killed all emerging green tissue turning it brown. This shocks the tree into delaying further spring growth for at least a couple of weeks. As I said before, I like to wait until I see new green leaves before making a graft. 

    Following late spring frosts experienced in the past, I patiently waited until secondary buds on the young trees started growth. I ended up grafting a couple of weeks later than normal but I still had good success. I'm hoping this year will be similar.

    I took a close-up photo of a frost damaged seedling tree (photo at left). You will note that all of the primary buds on this stem were frozen. However, the secondary buds have already started to green up. The red arrows in the photo point to easily visible green buds.  These buds will take a little while to fully develop and break into new leaves but I expect to be grafting in 7 to 10 days. The speed of bud development will depend on the weather. Warm temperatures and sufficient rainfall should push thing along.