 |
| A successful bark graft |
While making bark grafts this year, I photographed two examples of common problems encountered while bark grafting. But before I share those photos, you may want to review the description of my entire bark grafting method (click here).
The first common problem is trying to insert a bark graft on a tree with a relatively small diameter. The tree I was was working on was only one inch in diameter (photo at left). The scion I selected was roughly 3/8 inch in diameter. Fortunately, the stock tree had a relatively flat side which is always the best location for inserting a bark graft. When choosing a scion to use on this tree, I tried to match the diameter of the scion to the width of the flat spot. In the photo, I'm holding the scion adjacent to the stock's flat side .
When bark grafting small diameter stock trees, I try to carve my scion as thin as possible (photo at right). This actually makes the scion a little narrower than the original diameter of the scion because I carve down past the mid-point of the stem.
Carving the scion into a thin tongue of wood means that the two cuts made on the back of the scion need to be cut carefully as to not remove all the cambium. Note in the photo at left, I was still able to leave a strip of bark between the deep cut and the shallow backside cut.
The bark on small diameter pecan trees is often thin and quite pliable. By carving the scion down to a thin strip of wood, the scion slips easily under the stock's bark (photo at right.
After inserting the scion, make sure the 90 degree cut lines up with the slit in the bark of the stock. The bark flap should completely cover the back-side cut on the scion. Also, you should be able to see the strip of bark left on the scion peeking out of the bark slit (photo at right).
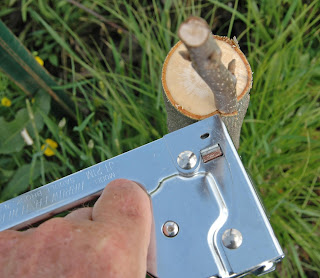
I use 5/16 light duty stables to make sure the scion stays in place and the bark of the stock is firmly held against the scion (photo at right). My first set of stables are placed at an angle spanning the slit in the stock's bark.
To eliminate all air spaces between the stock's bark flap and the scion, I place a row of stables vertically from the top of the stock to the bottom of the scion (photo at left). You can see in the photo how this row of staples bends the bark inward forcing the bark to conform to the scion.
Once I get to this point, I wrap the graft union in aluminum foil and a plastic bag as usual. Attaching a bird perch on this tree is critical because there is no way the thin strip of scion inserted under the bark can support even the smallest song bird.
The second problem I often face is grafting with a crooked scion. Whenever I graft, I always hold the scion in my hand and twirl it around to locate the straightest side. The photo at right shows the same scion as I rotated it around. The scion looks almost perfectly straight in photo 'C' and that is where I made my first and deepest cut.
After making the cut the scion still appears straight (photo at left).
However, the crookedness of the scion reappears when I rotate the scion. The tongue of the scion has a pronounced curve in it (photo at right). This is not a problem because I can deal with a curved scion after inserting it into the stock tree.
I continue to carve the scion into a wedge shape ignoring the curve in the wood (photo at left).
Once the scion is carved, I insert the scion under the bark (photo at right). Here's where the curvature in the scion becomes a problem. The scion is pulling away from the stock revealing a massive air gap.
To get the scion to conform to the stock, I start stapling at the bottom of the bark split. I move upwards, inserting staples as I go and pressing the scion against the stock. The staples hold the scion in place.
The outwards curvature of the scion also causes a huge air gap to form just to the left of the scion (photo at right). Again, I'll address this problem with staples.
I use my staple gun to press the bark of the stock up tight around the scion (photo at left). Then I shoot a staple in to hold the bark in place.
Once the top staple is set, I move down the stem inserting staples vertically to bend the bark to conform to the scion. At this point, my crooked scion is held straight and is covered tightly by the bark of the stock. Covering the graft in aluminum foil and a plastic bag completes the grafting process. Attaching a bird perch to prevent bird damage is also my standard practice.


