The photo at left shows how the small trees in my orchard are recovering from frost burn. Frost-killed buds are brown and are still attached to the tree. Secondary buds have broken and appear bright green and ready for growth. The appearance of this new green growth was the signal I was waiting for to ensure graft success.
Before applying a 3-flap graft, I prepare the stock tree by pruning off any small side limbs that might end up being the the way of wrapping the graft (photo above).
Next, I hold up my scion next to the tree and select a location to cut off the stock tree at the point where scion and stock are equal in size (photo at right).
After cutting off the top of the stock tree, I use my knife to split the bark to create the three flaps. If I see a bud on the stem, my first cut is always right through the center of that bud (photo at right). Bisecting the bud makes pulling down the bark flaps much easier, as you'll see in photos below.
After I make three slices in the bark equally-spaced around the stem of the stock, I tie a long piece of grafting tape around the stock tree just below the three cuts. Before pulling down the three flaps, I start carving the scion to expose cambial tissue of three sides. My first cut is always made to remove a bud at the base of the scion (photo at right). It is very important to make this cut deep enough, passing through the bark and cambium and exposing woody stem tissue.
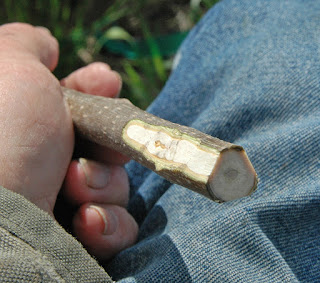
I repeat the bark-peeling cut three times to create a three-sided scion (photo at left). When looking at the cut you should see brown outer bark, greenish inner bark, a thin brown line of cambium and white wood at the center. One of the most frequent errors folks make while attempting a 3-flap graft is to not make the three cuts on the scion deep enough. You should see white wood exposed on three sides divided by strips of bark.
Once I have the scion carved, I move back to the stock tree and carefully peel back three flaps. Note the small pieces of wood that once stuck up into the buds (photo at right). By splitting the bark over the bud, I made peeling back the bark easier. Trying to peel the bark back right over a bud often results in the bark getting stuck and the bark tearing. One of the main reasons I use 3 flaps is because of the way pecan trees arrange their buds up the stem. If you look carefully at a pecan stem you'll note the buds are arranged in a spiral pattern. With three flaps, I find I can easily line up my cuts over buds to avoid bark tearing.
I use my pruning shears to push down the three flaps and cut out the wood inside the flaps (photo at left). When peeling back the flaps, I try to keep my hands off inside of the bark flaps.
Once the wood is cut out, the three flaps remain spread open (photo at right). That's when I grab the grafting tape and start winding it up the stem.
Wrapping the stock tree upwards with tape forces the three flaps to form a tight tube (photo at left). Holding the tape tightly, I can then insert my scion into the tube of bark and it will stay in place. I often try inserting the scion multiple times, turning the scion to see how I can get the best fit. The best fit is the one where all three cut surfaces of the scion are covered completely by bark flaps.
As I wrap up the graft union, I pull the grafting tape to ensure a tight fit. Once the graft union is completely covered you should be able to feel the three flat sides of the scion under the bark flaps. If you press on the side of the graft union and you feel bark movement, the graft is not tight enough. Just re-wrap the graft union, applying more pressure with the tape.
After making sure the graft is on tightly, I wrap the graft union with aluminum foil and cover with a plastic bag (photo at left). I add a drop of Elmer's glue to the top of the scion and attach a bamboo stake. Initially, the bamboo will prevent bird damage but later, I'll use it to provide support for new scion growth.


